Dear Readers!
I’m sure a lot of Readers have found themselves in a situation, when they had to start working home full time because of the pandemic that broke out recently, and as such they quickly need to set a permanent workspace somewhere at home up. For these people network access is a must, but not every suitable (repurposed) workspace might have Ethernet plugs or have good Wifi reception for that matter. In such situations it makes a whole lot of difference how such a scenario is handled from a security and privacy perspective. For instance, some people might not be totally comfortable with sharing their home wireless network credentials, home network layout and data flow with the company tech they suddenly need to use at home, so they might be looking into ways to both use some of the flexibility of a wireless network, and keep home network properties/passwords/etc a secret, while still being able to have stable network access.
The good news is, that meeting such requirements is quite achievable, and it doesn’t take that much effort to do so. Here’s what you’ll need to get things done:
- Your currently used router (preferably with some advanced capabilities)
- Your stashed/dust collector old router
- A bit of time and patience
As you can see, there isn’t much that is needed, so let’s begin.
Preparing your currently used router
In case you have at least a semi-decent router, this won’t be a problem at all. All you need to do is to set a guest wireless network up, to provide a completely separate (and isolated) wireless network for your company tech. Because of the great number of router firmware floating around (all with different interfaces), I’ll won’t even try to give a direct guide to create a guest network on your specific device, instead I’ll just link OpenWRT’s setup procedure for reference, which should at least give you a general idea what needs to be done. Since guest wireless network setups are quite common, the user guide of your particular router will probably be of even greater help in this.
One thing to remember here: when setting up the wireless network, make sure to set a standard (and such transmitting frequency) supported by both routers. Check the documentation of both devices to be sure. The good news is, that there is some level of interoperability between different standard versions: for example if the new router’s oldest supported standard is N type, and your older router supports only G type networks, the older router might still be able to connect to your N type network, depending on your firmwares. The bottom line is, don’t give up immediately if you see different supported standards in your routers, they might still work together.
Checking for updated firmware for old router
If you have some really old router like I have and you haven’t touched it in many years, it would be a good idea to search for an updated firmware as a first step. One could argue that very old routers don’t usually get firmware updates, but as surprising as it may seem, it’s not entirely impossible to find new (alternate) firmware for some of the then-very-popular 10+ years old routers. In my case, such a router is the legendary Linksys WRT54GL, and thanks to several talented guys out there, the then also very popular Tomato firmware is still getting updates, nowadays under the name of FreshTomato.
By looking at the repository it will become quite apparent, that there are a lot of precompiled packages available both for MIPS and ARM based routers, which is really good news, as there is a high chance that your device will have something for it as well. The bad news is, that there is no official documentation to help figure out which package belongs to which router, and which devices are supported in general. If in doubt, check wikipedia’s list or use old Tomato documentation (whichever fork’s) to gather some info on supported devices, image naming conventions (use google translate here), or simply use your favorite search engine.
Preparing to set old router up
After finding the appropriate firmware (in my case it was the freshtomato-K26_RT-MIPSR1-2020.1-Mini), it is time to install it. If you already happened to have a Tomato firmware (whichever fork or age), simply use the Update firmware page in the Administration menu. In this case it wouldn’t hurt to erase the NVRAM as well, as it is not really known how big the changes are between the current FreshTomato and older Tomato configurations. On the other hand, if you have factory firmware, take a look at the Tomato wikibook page first and follow the instructions for your hardware to install Tomato.
After having the new firmware in place, login to the web admin page, and take some time to set the general things up, like time, admin password, router name, etc. Now comes the real deal. Check what IP range your guest network uses in the main router: if your normal home network uses the 192.168.0.x range and the guest network uses the 192.168.2.y range, you’ll need the latter. Please note, that since you have two different networks, your router will have simultaneously two different IP addresses as well, one for each network. You’ll need to note the main router’s IP corresponding to the guest network, which in the above example could be 192.168.2.1.
Setting up old router
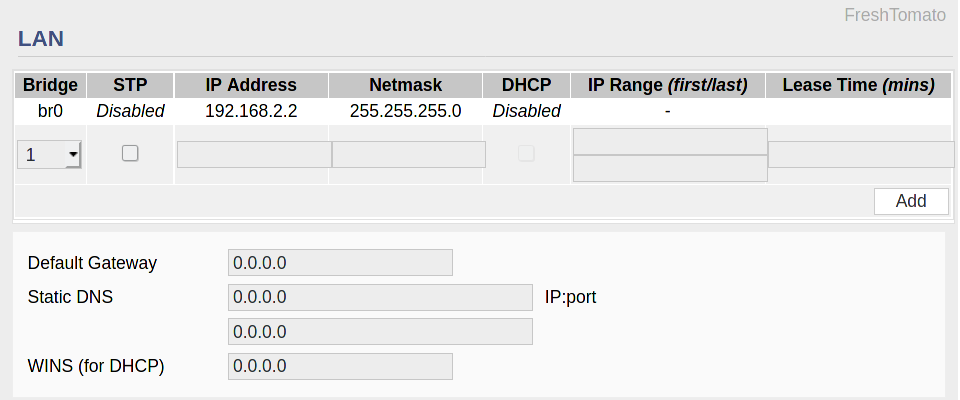
With everything else set, it is now time to set the old router’s IP to something other than the main router’s IP while being careful to set something in the same IP range as the previously set guest network. Something like 192.168.2.2 would be a good choice (you can find these settings under the Basic –> Network menu item). Also make sure to disable DHCP support here, see explanation a bit later. Remember this IP address, as this will be used to log in to your web admin interface of this router from now on. Now Reboot the router, then login using the new address.
Time to set the wireless network up. There are several possibilities to choose from, but assuming a mostly permanent workspace, I’ll go with the Wireless Ethernet Bridge mode, as this solution provides the most privacy and protection. This mode basically transforms your router into a wireless switch, which also means that network setup (IP assignment, firewall, etc) is strictly and exclusively done by the main (newer) router only. This is the reason why we needed to turn DHCP off in the older router earlier. There are several advantages to this setup:
- Your wireless network credentials are local to the router, none of it needs to be provided to the company machine.
- Company computer doesn’t see anything on the local home network, thanks to the guest wireless network.
- You can place the router to a place with the best reception if you have a few meters of ethernet cable.
- Routers usually have better antennae than laptops, which could also contribute to a better network performance.
The image below shows some possible settings for the aforementioned setup.

After applying the changes there isn’t much to be done, one just needs to connect the company comupter to the old router with an ethernet cable, and everything should work out of the box from now on. The network diagram below shows a possible end result:
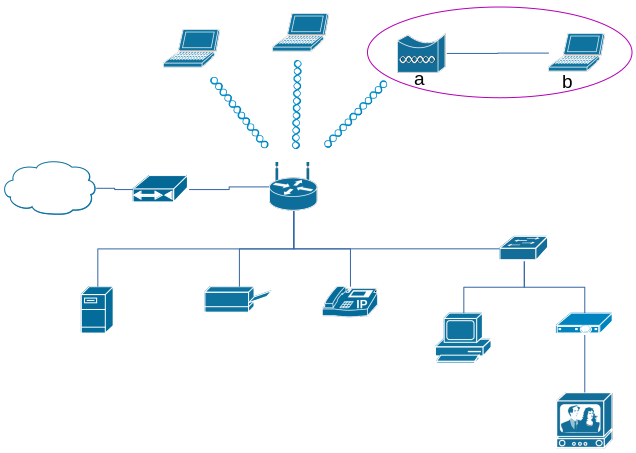
The two devices in the circle (which is a separate guest wireless network) represent the new additions to the existing physical network. As described before, device a) is an old router functioning as a wireless bridge, and device b) is the company laptop. It is important to mention again, that even though all devices are on the same physical network, laptop b) will not see the other devices thanks to the previously set guest network (and as such different IP range). Since we use a wireless bridge instead of connecting to the guest network directly, the wireless credentials are not revealed to the company laptop either.
That’s it for now, thanks for reading.